< Share | Follow >
If you survive the trauma, the chances of surviving asphyxiation may be less than 10% if buried by an avalanche. The only sure-fire way to avoid getting caught, injured, or killed in an avalanche is to stay out of avalanche terrain.
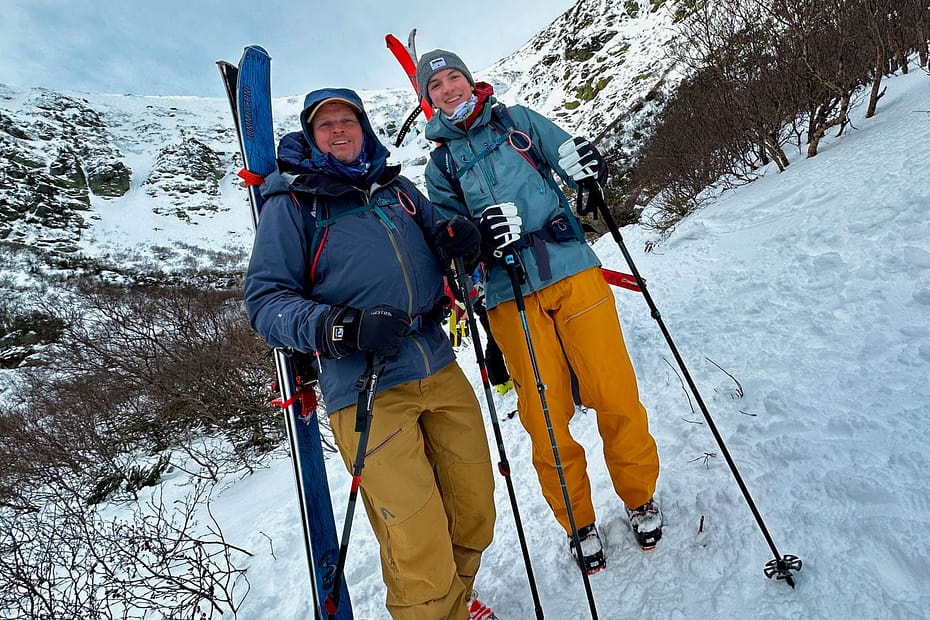
Recently, my nephew Sam and I completed an AIARE 1 avalanche education course.
If you ski or plan to ski in the backcountry, I highly recommend avalanche education. Read why.
Note: in this story I use the term “skier” to represent all winter sliding enthusiasts including boarders.
Why Did I Seek Avalanche Education?
I’m 57 and most of my skiing has been on New England resort trails. I raced for four years in college in the ‘80’s.
My wife and I raised our two daughters spending weekends at Mount Sunapee, NH where they raced on the Alpine Team.
When they went to college in VT (UVM) they embraced ski touring and backcountry skiing. They each had jobs as ski instructors at Smuggler’s Notch. When we’d visit for long weekends, they’d lead us to all the “secret stash” trees and side country.
After graduation, my oldest daughter Lulu moved to Jackson Hole, WY to live and ski. After a season she and her husband moved over the pass to Driggs, ID.
Touring in the backcountry, off the Teton Pass and through the gates at Jackson Hole and Grand Targhee, was for them a regular activity. I was excited to join them only to be told that before they’d take me into the backcountry, I’d have to complete my AVI 1.
What is AVI 1 or AIARE 1?
AIARE is the American Institute for Avalanche Research and Education. They’ve developed a standardized curriculum and approach for identifying and managing risk navigating avalanche terrain.
AVI 1 or more specifically AIARE 1 refers to a 3-day course combining classroom and on-mountain training. In addition to meteorology, snow science and mapping, the course helps you identify avalanche risk and make appropriate decisions while working in small groups.
The course also trains you to work as a team to rescue individuals that have become buried and or injured in an avalanche.
AIARE 1 is the introductory course that anyone entering avalanche terrain should complete. They offer more advanced training with a Rescue course and an advanced AIARE 2 for those who want to improve their knowledge and proficiency.
Visit AIARE at: https://avtraining.org/
How Dangerous Are Avalanches?
An average of 24 annual fatalities have occurred over the last 10 years in the U.S. (29 in the 2022-23 season) Read about them here: https://avalanche.org/avalanche-accidents/
Colorado accounts for one-third of all U.S. avalanche deaths. The Colorado Avalanche Information Center is a great resource. 5,813 avalanches were reported in the state during the 2022-23 season with 96 incidents involving 122 individuals and resulting in 11 deaths.
Their 2022-23 Accident Recap can be viewed here: https://avalanche.state.co.us/blog/2022-23-season-summary
Two Incidents Caught on Camera in February 2023
1) Owen Leeper Survives Jackson Hole Avalanche
Owen Leeper, an avid skier of the Jackson Hole backcountry, took a nasty slide down a narrow couloir sustaining painful injuries. Evacuated by helicopter, he suffered a shoulder dislocation that ultimately required surgery. He’s back at full strength for the 2023-24 season and you can follow his adventures on Instagram: https://www.instagram.com/o_leeps
2) Snowboarder Survives Mount Washington Avalanche
On February 25th, a skier triggered a massive wind slab to slide on Mount Washington in New Hampshire.
Caught on video you can see the slab fracture and slide below the skier. His buddy, on a snowboard, tried to stay clear of a potential slide by smartly positioning himself to the side of the skier’s line, but not far enough to avoid going for a ride as the avalanche consumed him.
Fortunately, he was only buried to his waist and was able to self-rescue without injury.
What is Avalanche Terrain?
Avalanches can occur anywhere that has snow and mountains with a slope angle between 25-60 degrees. Most avalanches happen on slope angles of 30-45 degrees.
We have resort trails in New England that do fall within that 25-35 degree sweet spot. Typically, these trails are well maintained and often groomed, which mitigates the risk of dangerous avalanches.
For perspective look at this table highlighting the slope angle of popular New England trails:
| RESORT | TRAIL | SLOPE ANGLE |
| Stowe | Upper Starr | 38.7 |
| Stowe | Lookout | 29.6 |
| Sugarbush | Stein’s Run | 26 |
| Sugarbush | Gondy Line | 28 |
| Smuggler’s Notch | Black Hole | 35 |
| Sunday River | White Heat | 27 |
| Jay Peak | Can Am | 25.7 |
| Jay Peak | Haynes | 27 |
| Jay Peak | Green Beret | 38 |
| Jay Peak | Face Chutes | 37 |
| Killington | Outer Limits | 27 |
| Killington | Double Dipper | 28 |
| Killington | Super Star Headwall | 26 |
| Mad River Glen | Chute | 25.6 |
| Pico | Upper Giant Killer | 24 |
| Loon | Twitcher | 23 |
| Magic | Red Line | 23 |
| Mount Snow | Ripcord | 35 |
| Attitash | Middle Ptarmigan | 26 |
| Cannon | Avalanche | 31 |
The AIARE1 course teaches how to assess slope angles but taking that measurement is more of an art than a science. Many trails will have a combination of slope angles that need to be considered.
AT Gear, A Ticket to the Backcountry
While it’s unlikely you’ll encounter an avalanche skiing eastern resort trails, with the huge growth in AT skiing (Alpine Touring) more and more folks are skiing avalanche prone “side-country” and backcountry.
AT equipment’s design allows for versatility. The heel of the binding can disengage while the toe can pivot like a Nordic ski. Adding a climbing skin to the base of the ski creates enough friction to easily move through the woods, across trails and uphill. AT gear has made the backcountry very accessible.
This story in Backcountry Magazine describes a considerable avalanche triggered in the back/side country accessed from lift-served Stowe or Smuggler’s Notch in Vermont:
For more reading on avalanches in the northeast, check out this excellent article “12 Myths About Northeast Avalanches” by Tim Peck and Doug Martland at GoEast.EMS.com
https://goeast.ems.com/avalanche-myths/
Western Resorts Use Dynamite, Bombs and Canons
Western mountains offering more open and steep terrain, often above tree level, are inherently more avalanche prone.
Ski Patrol at western resorts employ a range of measures to manage avalanche terrain including closing areas and triggering controlled slides with explosives. After the slide the snowpack is stable and safe(r) to travel through and below.
Palisades Fatal Inbounds Avalanche 1/10/24
Despite aggressive management humans simply can’t eliminate all risk of this natural phenomenon.
There was a fatal, skier triggered avalanche on January 10th at the Palisades ski resort in Lake Tahoe. It was opening day for the KT-22 chairlift that serves steep expert terrain viewable from the chair. Four people were caught in this slide. Tragically, one died, and another was injured.
Jeremy Jones, the famous big mountain snowboarder, and his son Cass were riding the KT-22 lift that morning. They were on their second run when the avalanche happened. Cass was first on scene and dug out one of the victims. Their recap of the day can be read here:
https://www.theinertia.com/news/jeremy-jones-tragic-first-hand-account-palisades-tahoe-avalanche/
Buried: The 1982 Alpine Meadows Avalanche documentary
For more tragic in-bound avalanche stories, check out the gripping documentary “Buried: The 1982 Alpine Meadows Avalanche” on Netflix.. It covers early efforts in avalanche management and the frantic search-and-rescue operation that followed this event. It also highlights the first trained avalanche dog rescue which spurred the Avalanche Dog profession.
https://www.netflix.com/title/81636855
A Note About Tree Wells
While not an avalanche, tree wells can be equally deadly both in and out-of-bounds. Tree wells form at the base of evergreen trees particularly those with wide low branches. The loose and potentially deep snow is unstable and can easily swallow a skier causing asphyxiation.
On an amazing powder day last March 3rd, this skier saves a snowboarder’s life who had literally disappeared into a ski well: (This video is terrifying.)
How to Rescue a Tree Well Victim
Ski Patrollers, in this video at Whitewater Ski Resort, demonstrate how to rescue a skier consumed by a tree well:
Back to Avalanche Education and How I Chose My AIARE1 Course
There are several fine AIARE course providers operating in the Mount Washington Valley. I was only aware of three options but while researching this article I discovered several others. They all cost roughly $500 – $550 for the three days of training. Most had AVI gear available to rent and some had gear that could be borrowed.
The three programs I considered were International Mountain Equipment (IME), Eastern Mountain Sports (EMS) and Synott Mountain Guides (SMG.)
The course descriptions and prerequisites for the three programs were all roughly the same reading like this:
“Students must be able to travel in avalanche terrain and bring appropriate equipment (backcountry skis, split-board, snowshoes, etc.) for traveling on snow to class. There are no other prerequisites.”
Each course indicated that they used multiple locations for the on-mountain component of the training with one of those locations being Mount Washington.
At the end of this article, I’ve provided links for the AIARE courses offered in New England.
Synott Mountain Guides (SMG)
The course I chose was offered by Synnott Mountain Guides (SMG), headquartered in Intervale, NH. The owner, Mark Synnott, has an impressive background in mountaineering around the globe and his team of instructors and guides seemed very legit.
I could say the same for the International Mountain Equipment, IME, folks but that business had recently sold, and I wasn’t as familiar with the new owners and instructors.
It was mid-October when I signed up for my AIARE 1 course scheduled for the third weekend in January. The classroom component on Friday was to be conducted at the North Conway Grand Hotel and the following two days would meet at the Pinkham Notch AMC Lodge at the base of the Tuckerman’s Trail on Mount Washington.
This seemed like a course that would provide lifesaving information and a fun adventure so, I invited my nephews, whom I often ski and surf with, to join me. Sam Dean, 17 at the time, signed up.
Since we booked in October for a January course, we had plenty of time to prepare. By “prepare,” I mean assemble the gear that we’d need and get the ski legs in shape.
Gear List
The following is the required and suggested gear list provided by SMG:
(At the very bottom of this article I’ve included links to gear that I use. As an Amazon affiliate, I would receive a commission on purchases.)
- Wool or synthetic socks
- Long underwear top and bottom, wool or synthetic (not cotton)
- Fleece or softshell pants
- Fleece Jacket
- Light puffy or heavyweight fleece jacket (a “light” puffy jacket weighs a pound or less)
- Down or synthetic parka (A parka usually weighs more than 18 ounces)
- Hard shell pants and jacket
- Warm hat that covers your ears entirely
- Balaclava/face mask
- 1 pair lightweight gloves
- 1 or 2 pair heavyweight ski gloves
- 1 pair warm mittens
- Goggles
- Sunglasses
- Snow travel equipment: AT Skis, Splitboard, Snowboard and Snow Shoes (Telemark was not mentioned)
- Microspikes
- Repair Kit (multitool or screwdriver, ski straps. Spare split board screws and binding parts, etc.)
- Ski Boots, Snowboard Boots or Mountaineering Boots
- Boot Glove (if suffer from cold toes check out the DryGuy Boot Glove
- Ski/trekking poles
- Ski Helmet for those on skis or snowboard
- Day Pack (35-liter or 2,200 cubic inch minimum)
- Headlamp with extra batteries
- 1.5 liters of water
- Lunch and snacks for each day
- Air-activated hand warmers
- Personal blister and first aid supplies
- Pencil
- Sunscreen
- Lip Balm
- Mount Washington Map
- Beacon
- Snow Probe
- Shovel
- Snow Saw
Avalanche Rescue Gear
Sam and I would both need to borrow or buy the avalanche specific gear which includes:
- Search and Rescue Beacon
- Probe (to penetrate deep snow to find a buried victim)
- Shovel (to dig out a buried victim and to dig test pits to observe snowpack conditions)
- Snow Saw (for creating test pits and for use as a traditional saw)
While Sam was happy to borrow gear from SMG, I wanted to own mine so that I’d have it for future adventures.
Snow Travel Equipment: Rented AT Gear for Sam
This would be Sam’s first touring experience. All his gear was strictly alpine, so he chose to rent AT equipment at Ski The Whites, now known as the White Mountain Ski Company, in Jackson, NH.
This is a great shop catering specifically to alpine touring. They also have an in-store coffee shop and usually a shop dog.
If you’re interested in backcountry skiing in the White Mountains follow the shop and its owner, Andrew Drummond on Instagram:
White Mountain Ski Company @whitemountainskico
Snow Travel Equipment: Telemark Gear for Steve
A few seasons back I took up telemark skiing. I had always wanted to learn, and I thought an added benefit would be the capability of touring. Telemark, a form of Nordic skiing, is of course the original backcountry format.
I figured if I could become proficient enough on telemark skis, I wouldn’t need a third setup of AT gear.
By our course date in January, I had been telemark skiing for three full seasons. I was comfortable on all the terrain I typically alpine ski and I’d had a chance to ski some decent powder at Alta and Grand Targhee. Had we been able to ski the Head Wall at Tuck’s I would’ve been more comfortable on my alpine gear, but I felt confident enough that I could successfully navigate the challenge on the tele skis.
New England Winter Was Slow to Come
As for getting the ski legs in shape … I dropped the ball here.
The beginning of the 2022/23 ski season was dismal. Virtually every storm came with a warm front that resulted in rain.
My home mountain, Sunapee, had very limited terrain causing overcrowded trails as everyone navigated the few that were open. What was open was skied down to ice in the first couple hours.
We were not logging days on snow that would naturally put the legs in shape and I was not hitting the gym to compensate.
I was ill prepared for the 2-mile skin up to the Tuckerman Bowl not to mention the ski down, lunging on telemark skis wearing a 30 lb. backpack.
Last Time I Skied Tuckerman’s: Flash Back 30 Years
I had not skied Tuckerman’s Ravine on Mount Washington since the early ‘90’s.
In my mind Tuck’s was a place you visited in the spring, after the resorts closed. The two times I did ski Tuckerman’s were in late April and early May.
The hike to the base of the Ravine is about 2.4 miles. In the spring the trail is mostly bare and flanked with streams running at high volume. The hike up to the base of the “Ravine,” is relatively gradual until you reach the AMC Cabin known as Howard Johnson’s or HoJo’s. From there to the base of the “Bowl” is quite steep and rocky.
While researching this article I found photos from my last 1993 Tuck’s ski trip … boy have things changed. I was using my college slalom race skis which were K2 VO-Slalom’s sized 200cm (watch the video and please give me a follow on Instagram.
< Share | Follow >
Mount Washington and Tuckerman’s Ravine
These days, skiing Mount Washington is an all winter and spring activity. Most winter days you’ll find the Pinkham Notch Visitors Center parking lot full of skiers, hikers and climbers.
When the snow is in, you can literally click into your skis in the parking lot and skin up the entire Tuckerman’s Trail the full 2.4 miles to the Hojo’s AMC building.
Typically, the transition from skins to boot pack happens at Hojo’s for the remainder of the hike up the Ravine.
When you’re done skiing the Bowl or other routes it’s possible to ski all the way down the John Sherburne Trail, “The Sherbie,” right back to the Pinkham Notch Visitor Center parking lot.
AIARE 1 Course Preparation
Two weeks before the course we received an email from SMG informing us that:
Day 1: Classroom – North Conway Grand Hotel. Arrive by 9AM. Plan to be inside until about 3PM with a 45-minute lunch break. Bring all gear but leave it in vehicles. The day will end with gear inspection to make sure everyone is properly set for the next two days outside in the mountains.
Day 2, 3: Presidential Mountains: Plan to be outside for 7-8 hours on the next two days beginning at 8AM and ending between 3PM and 4PM.
We were also provided with a link to the AIARE1 online Student Materials that included a study guide and quiz. It was our homework to complete the first several sections prior to arriving to class. This was a little more than an hours’ worth of work.
From the online portal you’re also able to download and print the course text, the 112 page “AIARE 1 Student Handbook, Decision Making in Avalanche Terrain.”
All Praise the Snow Gods
I skied the weekend before our course at Wildcat and Attitash and there was virtually no natural snow. Both mountains were less than half open with thin bases. The Sherbie was not skiable and the Tuckerman trail was un-skinable.
Things were not looking good for our course weekend. And just like that, it SNOWED the whole next week. Enough snow fell to set up the Tuckerman Trail for skinning and the Sherburne Trail for returning to the parking lot. Some of the lines in the bowl itself were skiable.
SMG AIARE 1 Course Weekend
Our Airbnb the weekend of the course was in Jackson. Conveniently 25 minutes from our classroom in North Conway and 25 minutes the opposite direction to the Pinkham Notch Visitor Center.
The Airbnb was also just a short walk to the Tuckerman’s Restaurant and an apres ski favorite, the Ledge Brewery. Tuckermans Restaurant, – Ledge Brewing
Friday Day 1 9:00 AM – 3:00 PM
Thursday night it snowed heavily. It seemed fitting to be driving to an avalanche education class while it was nuking outside.
The North Conway Grand Hotel is a large hotel well suited for conferences.
We walked into a basement level conference room with rows of tables and about 14 other students. At 57 I was the oldest student and Sam, at 17, was the youngest.
Friday is a day of classroom instruction building on the online curriculum we started as homework.
We were greeted by our instructor, Nick Aiello-Popeo. Nick, who looks about 10 years younger than his actual age, is a highly accomplished rock climber and guide. He had us laughing with his easy, self-effacing sense of humor.
To break the ice Nick had the class get together in small groups to interview each other. Rather than introduce ourselves to the class, we went around the room and introduced our new mates.
Most folks already had a good amount of experience touring and skiing in the backcountry and the majority owned AT equipment. Sam and another guy had rented gear. One gentleman had planned to go up the mountain on snowshoes (which is fine) but in the end he also rented AT gear. I was the only telemark guy.
The one woman in the class had spent a lot of time hiking and skiing in the White Mountains and was also a Saw Dog for the Granite Backcountry Alliance (GBA). The GBA manages a network of maintained Glades in New England for backcountry skiers. The Saw Dogs run the chainsaws for trail creation and maintenance.
If you’re a backcountry skier in New England check out GBA and consider supporting their efforts. They’re a great group. Granite Backcountry Alliance
Nick led us through the AIARE Student Handbook using lots of interesting personal experience and anecdotes reinforcing the material.
Tour Planning Websites
In addition to the course materials, we talked about other critical tools that improve safety in avalanche terrain. Specifically, weather forecasting websites, where to find condition reports online and APPS for mapping and route finding.
The websites included:
Weather.gov: the weather site for the National Weather Service featuring local current and long-range forecasts. National Weather Service
Avalanche.org: This is the National Avalanche Center, a site that links to local reports pertaining to avalanche conditions. It’s a partnership between the American Avalanche Association and the US Forest Service. Here you’ll find a lot of information available for mountains in the west and a little information on the Presidential Range in the east (mainly a link to the Mount Washington Avalanche Center)
Mount Washington Avalanche Center: If you plan to ski on Mount Washington this is the site you absolutely need to visit. The most current condition observations are posted on this site along with weather forecast links, accident reports, but most importantly, avalanche forecasts. They use a color-coded danger scale ranging from 1-Green = Low to 5-Black = Extreme.
Mount Washington Observatory: These folks know what’s happening on Mount Washington. They operate the Mount Washington Observatory weather station at the summit. The scientists of the MWO produce specialized forecasts for the higher summits of the White Mountains. You can get a real time glimpse at the weather with their several webcams.
Tour Planning Apps
The next component involves mapping and planning routes. I say routes because part of the course curriculum emphasizes “planning the trip” and “anticipating the hazard.” It may be that your Plan A has unexpected hazards or dangers that make a Plan B or even a Plan C a better option. It’s the work that you do in advance, anticipating potential challenges, that allows you to salvage a great day in the backcountry.
Creating a Plan A, B and C is made possible by using a mapping APP that not only helps with navigation but supports decision making with features like; GPS location and elevation, slope angle shading, topo, satellite layering, snow depth and avalanche forecast overlays.
This article does a nice job summarizing the top map apps for backcountry skiing: The Best Map Apps For Backcountry Skiing | Curated.com
They favor the Gaia GPS, CalTopo, Trailforks and onXBackcountry apps.
Note: if you subscribe to Outside+ for roughly $50/year, that subscription includes Gaia and Trailforks as well as Ski Magazine, the Outside Watch network (tons of films including the Warren Miller library) and a large collection of other outdoor magazines and content.
Outside Plus Main Subscription – Outside Online
Blake Keogh, Our Second Instructor / Guide
After lunch Nick was joined by a second instructor, Blake Keogh. Blake had just returned from an early morning trek up Mount Washington to score a fresh powder run in the “bowl.”
Blake explained that in addition to guiding and avalanche education he also has a passion for the psychological component of team interaction and group dynamics in the backcountry.
Nick and Blake presented the remaining sections of the Student Handbook and then we were sent to retrieve our packs and gear to be assessed. They were serious about making sure we had everything on the “Gear List,” so that we’d be prepared for whatever might occur on the mountain.
Quick detour … Tibia Fracture
I mentioned that my oldest daughter Lulu had purchased a home in Driggs, ID where she lives with her husband and dog. When my youngest daughter, Eliza, graduated from UVM, she and her boyfriend decided to move in with Lulu to experience a year living in the Tetons.
The week before my AIARE course, Eliza and a buddy were skiing in the side-country of Jackson Hole. Somehow, while going downhill, Eliza’s touring binding got set in walking mode, which essentially locks the toe in the binding. She had a slow, twisting fall and fractured her tibia.
Fortunately, Eliza has quite a bit of experience in the backcountry and has her WFR certification (Wilderness First Responder). Though she was in pain, she wasn’t panicked. Luckily, she had cell service and was able to call the Jackson Hole Ski Patrol. They asked where she was and though they don’t patrol the backcountry they said they would come to retrieve her.
Her buddy kept her company as they waited for rescue. She had extra layers in her pack along with her beacon, probe, shovel and other essentials like a peanut butter and jelly sandwich, which she ate.
When Ski Patrol arrived, they needed to haul her up a considerable way by ski mobile to get to a point that they could sled her down to the medical center at the base of the resort.
Praise the Jackson Hole Mountain Resort (JHMR) Ski Patrol and mountain medical team! Eliza was stabilized and ambulanced to Teton Orthopedics for surgery. An eight-inch bar secured with over 30 screws stabilized her leg.
The lesson here for me, on the eve of my AIARE course, was that accidents do happen. She was very lucky to be in an area that ski patrol was willing to service. Had she been in the backcountry off the Teton Pass, extrication would’ve been exponentially more difficult.
Gear Check
Nick and Blake had us unpack our gear spreading it out for review. They’d call out a required item and we’d all hold it up to prove we were in fact prepared.
When I assembled my gear, I was influenced by Eliza’s experience and put together a complete first aid kit. I also found a thermal blanket that could be used to create a litter for carrying or dragging an injured person to safety. Additionally, I made sure I had a snow saw that could also cut wood. I had a fire-starting kit, several lengths of cord, extra batteries, lots of duplicate layers, a thermos of hot tea and extra water.
Once everyone had proven their gear was up to par, we were divided into three groups and given instructions as to when and where to meet for our first morning on the Mountain.
Sam and I were to be in Blake’s group, and we were going to meet inside the AMC Pinkham Notch Visitor Center meeting room in the basement at 8 AM.
Red Park Pub
After class, Sam and I met up with Kris, Sam’s mom and my sister, at the Red Parka Pub for dinner.
The Red Parka Pub is one of my favorite après joints in the world. It draws a lively crowd from Wildcat, Attitash, Mount Washington and even Cranmore and Black mountains.
It’s been run by the same family for over 50 years and has an amazing collection of ski memorabilia on all walls and rafters, not to mention a popcorn dispensing gondola, chairlift seats, great beers and drinks, amazing ribs and live music on weekends.
There can be a long line to get in but if you’re in the area be sure to check it out. Red Parka Steakhouse & Pub | Glen New Hampshire (redparkapub.com)
After a great dinner we returned to our Airbnb, reorganized our packs and went to bed early.
Saturday Day 2, 1/21/23
Saturday morning we awoke to ideal weather. It was clear, crisp and 18 degrees.
Sam and I arrived at the Pinkham Notch Lodge promptly at 8AM. Blake and our group were already seated around a rustic wood table where we spent a few minutes chatting and getting to know one another.
Joining Blake was an assistant guide, Aaron, who was working toward his guide certification. Our group was comprised of Sam and me plus Mackenzie, the Saw Dog for Granite Back Country Alliance, Art, the next most senior participant, and AJ, who was the gentleman that rented AT gear instead of snow shoeing.
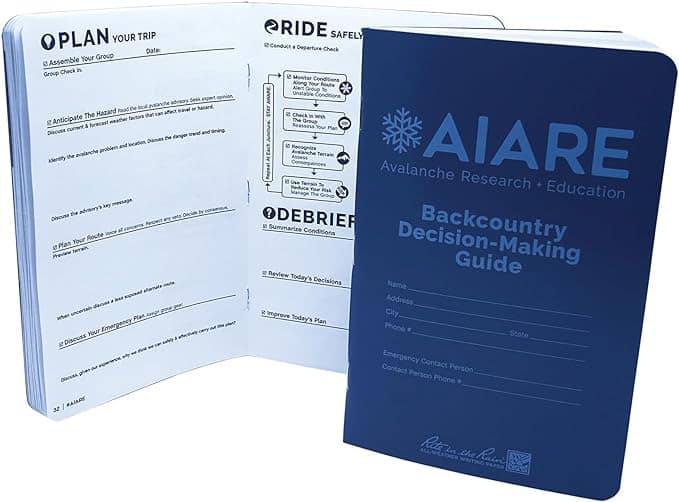
In class we had been issued an “AIARE Backcountry Decision-Making Guide.” This little blue book provides a standard way to discuss and record your intentions and strategies for the day including the following topics:
- Discuss current weather conditions and forecasts.
- Identify and discuss potential avalanche problems and advisory reports.
- Set a plan to manage avalanche terrain including options.
- Discuss an emergency plan.
- Perform a departure check confirming gear function.
The “Decision Making Guide” also includes reminders to check in and re-evaluate conditions and decisions along the route. It concludes with a section to discuss and record a Debrief of the day and an evaluation of the day’s plans.
You can download the AIARE Backcountry Decision Making Guide pages here: Sample-AIARE-Fieldbook.pdf (avtraining.org)
A Close Call in the Ravine
We finished our meeting and were exiting the Pinkham Notch lodge when Blake ran into one of his buddies who had just skied a run in the Ravine. He had been caught in an avalanche and gone for a ride but luckily came out of it unharmed and with all his equipment intact.
This created some excitement amongst the group; hearing a firsthand recap of what could’ve been a dangerous avalanche in the very spot we were heading.
Beacon, Probe and Shovel Rescue Drills
The plan for the day involved practicing with Beacons and Probes to locate a buried victim. The victim was a 16” square package that contained a Beacon in Send mode.
Our group was sent to skin down a trail while Blake and Aaron buried our simulated skier. When they yelled “help, avalanche,” we were meant to work as a group to locate and recover the victim and to discover the extent of injuries and devise a plan for evacuation if necessary.
We did this several times. The “avalanche debris field was the backside of the plowed parking lot.
Avalanche debris, though it may start as light snow, sets up almost immediately as frozen solid chunks which are difficult to shovel. The snowplow debris was a pretty accurate representation. We worked in rotations to reach the victim as the digging process was surprisingly exhausting.
Skinning The Tuckerman Trail
Satisfied that each member of our group experienced what rescuing an avalanche victim would feel like and that we understood how to use our tools while working in teams we took a break. Blake gave us a chance to have some water and a snack before we embarked on a skin up the Tuckerman’s Trail.
I quickly realized after 20 minutes of skinning how underprepared I was from a fitness standpoint. I was huffing, puffing, and sweating. The 30-pound pack wasn’t helping. I think I posed the question, “hey, do we stop at all on the way up?”
Fortunately, a stop was planned and everyone in the group was ready to shed a layer. After having some water and stowing our outer layer in our packs we were ready to resume the climb.
Sam, however, was still organizing his pack. When Blake asked “Sam, you about ready?” Sam replied, “two buckles.” The group appreciated the response, and he was honored with the nickname “Two Buckle Sam” by Blake.
This was my first-time skinning on my Tele skis and I was feeling it in the hip flexors. I was relieved when Blake told the group that the plan was to exit the Tuckerman Trail a little more than halfway up to dig some test pits and make some observations about the snowpack at that elevation.
Off the packed surface of the trail, the snow was deep. Blake led us to an area that was open enough for us to gather in a semi-circle. He then demonstrated how to use the shovel and snow saw to create a test pit for a column test. We made observations about the type, size, and shape of snow crystals at different depths and tried to identify layers.
Visually observing layers, we conducted basic pressure tests to determine the force required to penetrate the different snow surfaces. This involved assessing whether indentations could be made in the snow by a fist, finger, or pencil.
We then did an extended column test, ECT, by using the snow saw to create a free-standing column of snow. The shovel was placed on the top surface of the column and a series of ten taps were made using the weight of a hand on the top of the shovel.
This was to test the stability of the column. When nothing occurred another series of 10 firmer taps were issued using the weight of the hand down from the elbow joint. On the eighth tap the column fractured and slid forward and to the right. This indicated where the weak layer was located and allowed us to examine the snow structure of the layer as well as above and below the layer.
Had there been no fracture, the next step is another more forceful series of 10 taps using the weight of the full arm from the shoulder.
This was practice for the next day when we’d be responsible for conducting our own ECT’s and making our own observations.
MissoulaAvalanche.org has a great summary on conducting ECT’s here: An Extended Column Test (ECT) | Refresher – Missoula Avalanche
Ski Time
The John Sherburne Ski Trail, affectionately called the “Sherbie” runs roughly parallel to the Tuckerman Trail and serves as the down route from Tuckerman’s Ravine. We skinned a short distance through the woods, donned our helmets and prepared to transition from skins and walk mode to ski mode.
I was psyched for my first ever ski down the Sherbie. It’s a fun, twisting, mostly intermediate descent. Conditions were good but some steeper sections had been scraped off leaving exposed rock and ice.
This was also my first experience telemarking with a loaded pack. My quads feel the burn after a hundred yards of lunge turns on any day but with the 30-pound pack, the legs were quickly juiced requiring frequent rest stops.
The loaded pack also added side to side and forward and back momentum. It was easy to be thrown off balance in all directions.
We all made it safely back to the Pinkham Notch parking lot and met inside to debrief after we stowed our gear in our cars.
Homework
Blake said our homework would be to consider three potential plans for the next day including Plan 1: Left Gully, Plan 2: Right Gully, Plan 3: Escape Hatch.
The first chore was to determine what these routes represent in terms of climbing, skiing, slope angle and aspect. We were meant to consider all available information including past, current, and projected weather, today’s column test observations, the avalanche forecast, plus data provided by the Mount Washington Avalanche Center. If we had mapping software like CalTopo we were encouraged to map the routes.
Ledge Brewery – Small World
The plan for Saturday night was to have a good home cooked meal, attempt our homework, re-pack our gear for the morning and get to sleep early. Sam had some school homework he needed to tackle so I walked to the Ledge Brewery to unwind a bit before dinner.
In very small world fashion, the bartender at Ledge was the same guy we met in the Pinkham Notch parking lot who had been caught in the Ravine avalanche.
Sunday Day 3, 1/22/23
Sunday morning, Sam and I arrived at 8AM to meet our group at the Pinkham Notch Lodge. Turns out our homework wasn’t just hypothetical but was going to be our actual plan for the day.
I think everyone took a stab at researching the three ski routes, the weather and the potential avalanche risk but I’m not sure everyone was prepared to potentially go ski a line in the Ravine.
This brings me back to the beginning of this piece where I was talking about the prerequisites. Recall that all the courses I researched had similar prerequisite statements reading like:
“Students must be able to travel in avalanche terrain and bring appropriate equipment …”
I think these should be amended to clearly state that “Students may have an opportunity to ski at least one of the main lines in the Ravine or on Mount Washington.” One, because that’s a huge benefit, the opportunity to ski Mount Washington with a guide, and two, because that may be beyond the skill set of folks considering the course.
Around the table we discussed the condition reports for the day. The Mount Washington Avalanche Center had downgraded their danger scale from Considerable to Moderate.
Reading the observations our group concurred that though the danger level had been reduced to Moderate they seemed to be conveying in the report that certain areas of the mountain may still fall within the Considerable range.
I was open to a plan that included skiing a Ravine line but was somewhat relieved when the group felt it was an unnecessary risk, especially considering the previous day’s human triggered avalanche.
The agreed plan for the day was to skin the Tuckerman Trail for 1,800’ of elevation gain to Hojo’s. The caretaker’s lodge is not open to the public but has a nice deck with picnic tables.
Here we would have lunch, swap out of wet layers and prepare to climb up into the Ravine. The plan was to construct our own test pits and conduct ECT’s in the snowpack that would be similar to what we would ski if that had been the plan.
Equipment Check
Before leaving the Pinkham Notch base, the first order of business was a group gear and beacon check. Verbally we all affirmed that we had our beacons, shovels, probes, saws, first aid, layers, food, drink, etc. We then designated a “searcher” who would test that each of our beacons were fully charged and broadcasting a signal in Send mode.
The searcher checked each of our battery levels and then skinned a hundred yards up the trail. One by one, with our beacons set to Send, we skinned up the trail toward our searcher who verified that they detected our send signal on their beacon. Once everyone was successfully tested, we did the same for the searcher.
Having proven our beacons were all functioning properly we commenced the uphill skin.
The trail was in great condition and despite hip flexor fatigue it was a joy to be skinning with our group. Conversations were enjoyed as we made our way up to Hojo’s.
One highlight along the way was being passed by the Trail Bully snow cat hauling supplies to the cabin. Enjoy this short video and wait for the snow cat beeps:
We reached Hojo’s around 11:30 after about two hours of skinning. There was a surprising amount of folks already using the various picnic tables. Several groups were guided avalanche courses like ours and there were several other parties that had skinned or snow shoed up to enjoy the day.
It really couldn’t have been better weather. To this point it had been clear, little to no wind and a temperature in the mid-teens.
We took a half hour to swap out wet base layers and to have a quick lunch. By noon we were re-assembled and in hiking mode with our skis strapped to our packs.
The next segment involved a steep hike over snow covered rocks to get to the base of the Ravine, an area affectionately known as the lunch rocks. This took another 30 minutes and afforded some spectacular views of the Mount Washington Valley.


Our trail led to the looker’s right side of the Ravine beneath Right Gully.
We left the trail, hiking through thigh deep snow, to find an out of the way area to conduct the ECT’s. Each of us needed to clear a working space and construct a proper pit and column to make observations that we would record in our AIARE Backcountry Decision-Making Guide.
Creating our pits and columns and recording observations took roughly an hour. As we did this, we were able to watch one of the other avalanche course groups make their way up Right Gully. They chose to transition a couple hundred yards up the boot pack trail for a fun, short run without fully committing to the more avalanche prone section of the Ravine.
With our ECT’s completed we stowed our shovels and saws back in our packs and geared up for our hike back down to Hojo’s. By this time the sun was getting lower, clouds had rolled in, and the wind was picking up.
At Hojo’s Blake announced he wanted to show us something cool involving a big avalanche from the past. We got our skis on and skinned down toward the Sherburne Trail taking an off shoot through the woods to a clearing. Now we were looking up the left side of the Ravine toward Left Gully.
Blake wanted us to look around and notice any signs of past avalanches. You could clearly see trees that had been snapped off clean about ten feet up. Blake explained that several years back there was a significant avalanche that came down the Ravine and through this clearing. The path was obvious as we looked at the trail of snapped trees. The snowpack must’ve been dramatically deeper, by ten feet, at the time of the avalanche.
The Sherbie
With the avalanche education component of our time on Mount Washington complete we were left with the awesome task of skiing the Sherburne Trail down to the Pinkham Notch parking lot.
The skiing was a blast. The winding series of switchbacks felt nostalgic which makes sense as the Sherbie was cut in 1934. The trail was in great shape.
Even if you don’t aspire to ski any of the classic lines in Tuckerman’s Ravine, on a good weather day, the skin up to Hojo’s and down the Sherburne Trail is a memorable adventure.
By the time our group had reached the parking lot it was nearly 4PM. The sun was gone and replaced by wind and clouds full of moisture. Blake told us to stow our gear in our vehicles and meet inside for the “debrief” component of our “Backcountry Decision-Making Guide.”
Group consensus was that we had a wonderful, safe and educational experience on Mount Washington. We reviewed the “snow science” observations made during our extended column tests. We reflected on our Plan for the day and how we felt about our decisions. Given the deteriorating weather and the fact that the group we observed going up Right Gulley hadn’t returned yet, we felt comfortable with our decision not to pursue a Ravine Line that day.
Sam and I enjoyed the folks we got to know in our group and felt that Blake did a great job teaching and guiding us through decision making. Look him up on Instagram for a view of Mount Washington through his lens. Most of his winter and spring is spent going up and down the mountain. @blakekeogh
We said our goodbyes just as the skies opened up and started dumping snow. Our drive back to Massachusetts was slow going but Sam and I had lots to chat about from our three-day AIARE 1 adventure.
As I was finishing this article several major avalanche events took place.
Mount Washington Accident 12/9/23
A dangerous accident occurred on the Great Gulf run on Mount Washington on 12/9/2023. Dominic Torro, a guide who spends most days of his winter climbing and skiing Mount Washington, was evacuated by helicopter after being caught in an avalanche. He sustained severe damage to his leg with both tibia and fibula fractures.
Here is some terrifying footage of the slab fracturing above him, point of view footage during the slide, the helicopter rescue and the resulting damage. WARNING: the damage portion at the end of the video is graphic.
This YouTube version has the accident from the skier’s POV
Thank You and Stay Safe
Thank you for reading my AIARE 1 experience story. I’ve learned that you cannot have enough experience in snow science, weather, route finding and avalanches to outsmart mother nature but, every bit you learn, and experience reduces your risk.
Please follow me on social media and Comment below your own experiences with avalanches and backcountry adventures.
< Share | Follow >
LINKS: Gear Links, AIARE Course Providers, Avalanche Centers
Gear Links
Below are links to items and gear that I use and recommend. As an Amazon affiliate, I would receive a commission on purchases.
| GEAR | AMAZON LINK | ROUGH PRICE |
| AIARE Backcountry Decision Making Guide | https://amzn.to/3OtRTuL | $30 – $40 |
| Ski Socks – Smartwool – warm, comfortable, durable | https://amzn.to/4br3R1R | $33 |
| Base Layer Bottom – Smartwool – merino wool | https://amzn.to/491E3rP | $105 |
| Base Layer Top – Smartwool – merino wool | https://amzn.to/493ygSn | $110 |
| Gloves Hestra Army Leather Gore-TEX – Waterproof | https://amzn.to/4bpV948 | $145 |
| Mitts Hestra Army Leather Gore-TEX – Waterproof | https://amzn.to/3w1T4uZ | $190 |
| Leather Gloves – Give’r Four Season – durable and waterproof liner | Use Code: GIVERSTEVE | $119 |
| Hot Hands hand warmers – 40 Pair | https://amzn.to/3uqprmH | $27 |
| Dry Guy – Neopreme Ski Boot Cover for cold toes | https://amzn.to/3w622r4 | $40 |
| Microspikes – Kahtoola | https://amzn.to/3utveI0 | $75 |
| Voile Straps (3 – pack) | https://amzn.to/49sdI61 | $21 |
| First Aid – Mountain Series | https://amzn.to/3HPRtLk | $70 |
| BLACK DIAMOND Equipment Bd Guide Bt Beacon | https://amzn.to/487FnrV | $500 |
| Backcountry Access T 4 Rescue Package – kit including Beacon | https://amzn.to/3wd5rEp | $460 |
| Black Diamond Snow Saw | https://amzn.to/3SMZdUM | $60 |
| Black Diamond Storm 400 Headlamp | https://amzn.to/3SMvhrH | $46 |
| Ski Boot Dryer Sticks – plug in over night for dry boots | https://amzn.to/4blLknX | $40 |
AIARE Course Providers in New England
Avalanche Centers & Organizations
| Chugach NF Avalanche Center | Girdwood | AK |
| Alaska Avalanche Information Center | AK | |
| Hatcher Pass Avalanche Center | Palmer | AK |
| Kachina Peaks Avalanche Center | Flagstaff | AZ |
| Bridgeport Avalanche Center | Bridgeport | CA |
| Mt Shasta Avalanche Center | Mount Shasta | CA |
| Sierra Avalanche Center | Truckee | CA |
| Eastern Sierra Avalanche Center | Mammoth Lakes | CA |
| American Avalanche Association | Denver | CO |
| Colorado Avalanche Information Center | Boulder | CO |
| Crested Butte Avalanche Center | Crested Butte | CO |
| Idaho Panhandle Avalanche Center | Ponderay | ID |
| Payette Avalanche Center | McCall | ID |
| Sawtooth Avalanche Center | Sun Valley | ID |
| National Avalanche Center | Bozeman | MT |
| West Central Montana Avalanche Center | Missoula | MT |
| Flathead Avalanche Center | Hungry Horse | MT |
| Gallatin National Forest Avalanche Center | Bozeman | MT |
| Mt Washington Avalanche Center | Gorham | NH |
| Mount Washington Observatory | Mount Washington | NH |
| Central Oregon Avalanche Center | Bend | OR |
| Wallowa Avalanche Center | Joseph | OR |
| Utah Avalanche Center | Salt Lake City | UT |
| Bridger-Teton Avalanche Center | Teton Village | WY |
| Northwest Avalanche Center | Seattle | WA |