< Share | Follow >
My Instagram, @SteveOrne is full of Reels featuring self-captured videos of skiing, surfing, and mountain biking. (please give me a follow)
It’s taken years of messing around with the GoPro camera and various mount techniques to arrive at something I find useable.
Recently I shared a Reel showing my two favorite mounts for capturing skiing videos. I got lots of questions on how to do this so I’m sharing everything you need to capture yourself in GoPro skiing or boarding videos.
For your convenience I’ve posted links to the GoPro cameras and accessories on Amazon (I’m an affiliate so would receive a small commission)
First, You Need a GoPro
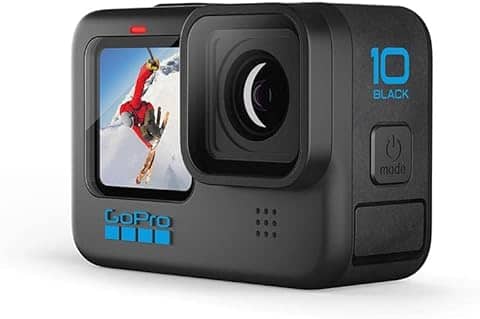
I’m using an older model, the GoPro Hero 10 Black. It’s less expensive than the 11, and 12 but has all the features I need. Below are links to those three cameras:
GoPro Hero 10 Black: $249 ish – https://amzn.to/3whdcJO
GoPro Hero 11 Black: $299 ish – https://amzn.to/3w6NPKr
GoPro Hero 12 Black: $349 ish – https://amzn.to/3SCS9sH
Now Learn to use your GoPro
When I started out with my GoPro, I was frustrated with the POV (point of view) footage I was capturing.
If I was skiing a steep narrow line or fresh snow in a glade, I would only record the view out in front of me. There was no reference to my skis, boots, poles, etc. so it was just a view of scenery.
Here’s an example of the early struggle. I’m using a helmet mount and in order to capture my skis and poles, the angle is too downward facing and results in a lousy video.
NOTE: This is an example of a bad mount.
Second, I Recommend a GoPro Max Lens Mod
The Max Lens Mod is an add-on lens that easily replaces the stock lens. The stock lens rotates off and the Max Lens rotates on in its place.
The GoPro Max Lens Mod includes these benefits:
1. Ultra-wide field of view (FOV):
- Expands the FOV of the Hero 10 Black from 132° to 155°, capturing a significantly wider angle of the scene. This is perfect for capturing immersive POV shots, action sports, landscapes, and group activities.
2. Enhanced video stabilization:
- Upgrades the Hero 10 Black’s stabilization to Max HyperSmooth, which GoPro claims is their most powerful stabilization available.
- This allows for smoother, steadier footage even in demanding situations like high-speed activities or shaky mounts.
3. Horizontal locking: Keeps your shots level and steady, even if the camera rotates during recording.
After installing the lens, when you turn on the camera and swipe down to settings there’s a “setup Max Lens” option that will engage the wide-angle features of the lens. (If you switch back to your stock lens, remember to switch this setting back.

GoPro Max Lens Mod: $70 ish – https://amzn.to/48njJQA
Third, If Recording for Reels or TikTok Film in Portrait Orientation
With the right camera and lens the next challenge is how to mount and film worthwhile footage.
There was a lot of trial and error involved with getting this wired. The first hurdle was that for Reels I wanted to capture video at 9:16 portrait orientation but most mounts, and the camera itself, have a landscape orientation.
I had to use extensions, angles, and joints to reconfigure the mounting accessories into portrait orientation. This setup was cumbersome and not completely stable.
Horizon Lock
Then I discovered a GoPro setting called Horizon Lock. Horizon Lock allows the camera to record in portrait mode even if you rotate and mount the camera in landscape. To access this setting:
1) Power on the GoPro and swipe down on the screen to access Settings.
2) Rotate the GoPro so you’re holding it in portrait orientation.
3) Tap the button that has a center square surrounded by 4 triangle arrows.
4) This will turn blue and become a square with one triangle arrow on the top.
This indicates that the orientation is now locked in Portrait Mode. If you rotate the camera into Landscape orientation, the lens is still going to record in the portrait format.
Now you can mount the GoPro in the standard landscape orientation but record in portrait. This was a game changer for me.
Watch this YouTube video for a demonstration:
Fourth, Mounting Options
The biggest challenges I had experimenting with mounts while skiing included:
- Carrying the mounts with me without needing a backpack
- Setting up the camera on the mount when ready to film
- Controlling the camera once mounted
- Keeping my hands warm after managing the camera and mounts
I tried lots of different mount options including:
- Helmet Mount
- Chest Mount
- Selfie Stick
- Pole Mount
- Bite Mount
Helmet Mount
I had several issues with the helmet mount. First, I only want my camera exposed If I’m about to film. To attach the GoPro and control the camera you really need to take off your helmet. Some of the best filming opportunities are during snowstorms. Dealing with goggles, neck warmers, your helmet, the camera, mounts and controls in a snowstorm is both unpleasant and inefficient.
Though there is a voice control option for the GoPro, I wanted to be certain I started and stopped recording when intended.
I’ll also use the display to make sure I captured what I wanted.
The point of view is also above what I prefer and captures less of the skier’s body. (Refer to the earlier helmet mount video.)
Chest Mount
While I like the chest mount for SUP surfing, I didn’t like wearing the harness over my hard shell while skiing. That meant I’d need to carry it and put it on when I was ready to film. The harness itself is a little too big to comfortably fit in a pocket so I found I was wearing a backpack just to carry accessories.
The display of the camera is also difficult to access while mounted and I was spending a lot of time without gloves in an often cold and wet climate.
I do, however, like the POV that the mid-chest mount captures.
Selfie Stick With 90 Degree Angle
The selfie stick, like the chest harness, required I wear a backpack as it wasn’t a pocket item. It also creates the problem of what to do with your ski pole while you film with the camera on the stick.
I do like the POV of the footage though. With the selfie stick you mount the camera so that it’s facing the skier. It’s like you are your own “follow camera.”
I also like that you have a broad range of options based on where you position the stick. Low or high in front of you, to the side or even behind you looking forward are all options for capturing a variety of viewpoints.
That being said, here are my two favorites mounts that I use almost exclusively.
My Two Favorite Mounts
These two mounts are both small enough to be carried in the pockets of my hard shell.
Both mounts allow easy access to all the camera controls and the camera display.
Each mount also captures what I feel is the best POV.
1. Pole Mount
The Pole Mount is a bracket which clamps to the basket end of your ski pole. Once mounted it has all the advantages of the selfie stick allowing you to capture front, side and back views.
Its small size allows it to easily fit in your pocket.
The Camera mount can rotate and lock in 90-degree increments so you can pivot the lens to face toward or away from you.
The most challenging part of this mount is skiing smoothly as you hold the camera in front, beside or behind you. The more difficult the terrain, the more challenging this becomes.
GoPro Pole Mount : $30ish – https://amzn.to/49conC4

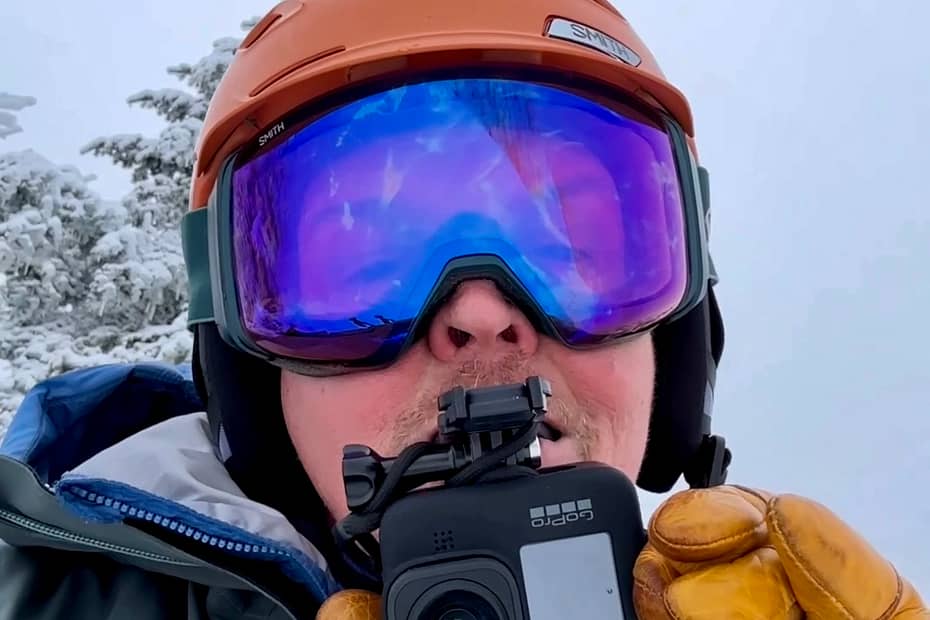
2. Bite Mount
I love the small size of the bite mount and how easy it fits in most pockets. I sometimes carry the camera mounted to the bite mount in my pocket making it a true grab and film situation.
The camera is easily controlled once mounted and the POV is great.
The only downside is that you’re holding the camera in your mouth with your teeth so don’t let it drop. Sounds weird but once you’re used to it you can easily ski a line holding the camera this way.
GoPro Bite Mount: – $30ish https://amzn.to/48jsDye

Pole Mount Powder
Pole Mount Spring Corn
Mouth Mount Groomer
Editing in GoPro Quik App
Once you’ve captured your footage use the GoPro Quik App to edit out the sections you want to use. The GoPro Quik App easily connects your GoPro and your phone using Bluetooth and wifi.
I select segments of recorded videos to save and download to my phone where I do further editing before sharing to Instagram or other platforms.
Please give me a follow on Instagram at: @SteveOrne
Please feel free to share this post as well as any comments or filming tricks you’d like to share.